


Hallberg-Rassy 31 Monsun packbox replacement
During the past few years the packbox had been leaking too much. The bottom of the bilge was always wet, and many times we had to pump out bilgewater into the sea. The plan to swap the packbox to a modern rubber membrane seal had been growing in urgency. Now the shaft also had gotten a bit of free play and had started to vibrate while running the engine. So it was time to make a change. This took some effort, but the result has been very pleasing. Here is a stepwise description of the way it was done.
Remove the propeller
The first step was to remove the propeller. This took quite some force and various methods had to be attempted. The prop sat as if it had been welded onto the shaft.
First, after unscrewing the shaft nut a few rounds, I tried to pull it off the shaft with a regular propeller puller. It would not budge. Let the nut sit so that the prop does not fall onto the ground and gets damaged. Just unscrew it a few rounds with a wrench.
Secondly, I tried heating the propeller with butane gas torch, while wrapping cold, wet cloth around the shaft. Had a bucket of water standing nearby for in case things would catch on fire. Luckily, this did not happen. But the prop did not come loose.
The third attempt succeeded. We were two persons. One heating the prop with a torch and then hitting the prop body (not the blades!) with a heavy hammer. The other person was pulling on it with the puller. Voila, we got it to go. Make sure to keep track of the key that is in the track on the shaft, and the brass folding tab washer. You will need these again when replacing the prop.
Remove engine cables, hoses and shaft
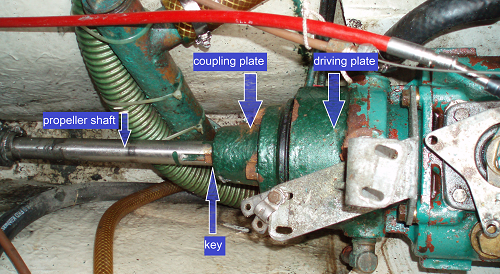
To get to the prop shaft it is a good idea to first remove (loosen) the throttle, gear and evacuator cables from the engine block/gearbox. I also removed the cooling water (seawater side) hoses from the gearbox side. This done, it was time to loosen the coupling plate that is holding the shaft from the gearbox drive plate.
This was a piece of cake, four bolts with insex heads, that came loose very easily from the driving plate. But then the problem was that the shaft was stuck onto the coupling plate as if welded in place. The set bolt that went straight through the shaft and coupling plate was rusted in place. Not wanting to damage the plate or the shaft I drilled it out with a 6mm stainless steel cobalt head drillbit, using a little oil as cutting fluid. When it was gone, the shaft was still stuck on hard.
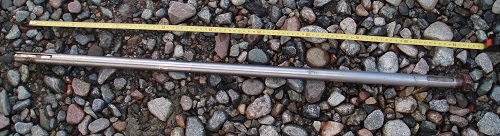
So back to the torch, hammer and big wrenches. I put a metal piece of about 10mm diameter and a length of 25mm in the mouth of the coupling plate (on the centre of the shaft end) and used four long bolts to press it against the transmission plate. After a few rounds of heavy sweating, the shaft pressed out of the coupling plate. Even this time make sure you hold onto the key that is in a track in the shaft end. The shaft is 93cm long (see picture below).
Remove the packbox and cutless bearing
Now the shaft can be pulled out past the rudder blade, thereby removing it from the packbox and cutless bearing. In my case, the cutless bearing was so worn down that it was stuck onto the shaft and came out along with it. I had to use a hacksaw to cut it loose from the shaft. It was in very bad shape.

The packbox and greasebox were then removed from the engine compartment and portside storage compartment, respectively. I also removed the filler line (hose) that went between the two.
Then I cleaned out the stern tube from old grease and other goop. Cleaned the shaft itself, and checked it for straightness and wear and tear marks. Lightly polished it with a very fine sanding cloth.
Install new sealer, cutless bearing, and shaft
After cleaning everything out, it was necessary to cut in new threading in the holes after the drilled out set bolt and bearing set screws. The threading was M8 for the set bolt, and M4 for the new set screws in the cutless bearing lining.
The cutless bearing was a little too long for the stern tube, so I stuck it in the tube and cut it off with a hacksaw. Then I filed the end of the bearing shell and turned it around before attaching it in the stern tube with the two new set screws.
With that done, the shaft was pushed back into the stern bearing and forward through the new water lubricated sealer and a stainless steel hose clamp. And after attaching the sealer to the stern tube with the double sided hose clamp, the coupler plate was put back onto the shaft, setting the key in the track, and aligning the set bolt holes on either side of the plate. Put back the new set bolts in place, and re-attached the couling plate onto the transmission plate with new M10x26mm bolts with insex heads.
Put back the propeller and anode
Now it is time to replace the propeller, using the key in the key track. Don't forget to put a little water resistant lubricant grease on the shaft before putting back the prop. This will make it easier to remove the prop the next time. Then put in the folding tab washer, and finally the nut. After tightening the nut enough to get the prop in the right position, fold over the tabs of the washer on the sides of the nut. Then put on a new zinc-anode on the prop shaft. Ready to get the boat back in the water!
The MD11C Volvo Penta prop shaft and old greasebox type packbox
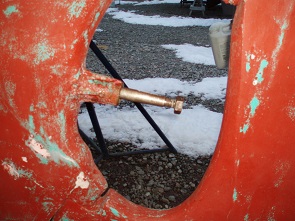
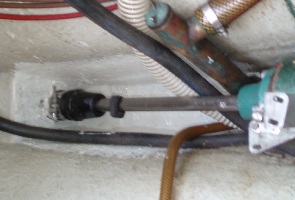
The shaft sticking out of the stern tube with the propeller removed
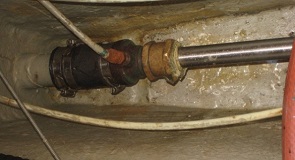
This is how the engine compartment looked after replacing the packbox with a water lubricated sealer
© Johannes C. Knulst, 2008-2024
Nationality: The Netherlands -- Registration and Home port: Visby, Sweden -- MMSI: 265635830
From January 2019 this site is upgraded with PHP-version 7.3 and MYSQLi compatibility.
SV Isabell is an excellent long-range sailing vessel for single handed sailing or small family expeditions. Safe, sound, and well built. With a D/L ratio of 342 this 31-foot boat gives a comfortable ride, wherever you sail.
